Wednesday, November 24, 2010

Luke's Zombie Killer Vs. The Pumpkin

Luke came by again yesterday. The sheath is mostly done, just needs a shoulder strap.


He worked on a companion knife that will ride on the strap across the sheath. Got it forged, filed, and heat treated, and will get a handle on it later.

We also had some cutting fun:

Tuesday, November 23, 2010

How To Sharpen a Knife Blade to Shaving Sharp...

...The Simple (Not to Be Confused With Easy) Way, in Three Fits.

Fit the First:


Fit the Second:


Fit the Third:

Sunday, November 21, 2010

Finished

And the finished product:


With the sheath:


In the sheath:


And a close-up shot of the handle. There's more grain visible in the Filipino ebony and the desert ironwood than my camera can capture.

Friday, November 19, 2010

Making it comfortable

Almost but not quite finished.

So here's how it was this morning:


I rarely make a knife where I don't do something new for the first time. One of the things this go-around was using a fairly aggressive (36 grit, I think) sandpaper wheel on my angle grinder to rough out the handle. In this picture, you can see that I have the sandpaper wheel backed with a worn flapwheel.


This really ate it down in a hurry. Saved a lot of time and clogging at the belt grinder. Had to be careful not to mess up the handle, though.


Then, off to the belt grinder.


After getting the end of the handle fairly close to where I wanted it, I drilled the lanyard hole.


I left myself some wiggle room in thickness so I could grind down past any splintering from the drill coming through the wood. There was a little bit, so I worked on the belt grinder some more.


There was a bump in the Filipino ebony where the index finger goes. I took it out with the four-in-hand rasp before smoothing on the belt grinder.


The lanyard hole was going to be lined with a metal thong tube, the second time I had tried this, and the first time I had used "official" thong tube material.


I tried to flare the ends with some flaring tools I had made and used on the other thong tube, but this was much sterner stuff, and actually began to dig into the flaring tools more than flaring! I ended up peining lightly, which did the trick, then grinding over the outside.


After some more time at the belt grinder, this is where it stands now:

Thursday, November 18, 2010

Handle work

Time for the handle. First off, I cut out the piece I'm going to use from the main block. The first layer in the handle is Filipino ebony.


Then I smooth up the sides and get everything as flat as I can. I use a variety of tools for this, but primarily use wood rasps and my belt grinder. I did try this Harbor Freight mini-plane for the first time. It actually did all right.


After the ends are flat, I drill the hole for the tang and widen it out with a mortising chisel I made form a hay rake tine.


Once it fits right, on to the next layer: osage orange, a.k.a. bois d'arc or the Texanized "bodark". You can see that it starts lemon yellow and ages to a burnt orange.


The same process is followed. Afterwards, I fitted two stainless steel spacers, which was all kinds of not-fun. I finally got them to work out, though, and moved on to the end piece, some desert ironwood. This is very hard, dense, beautiful, and on the expensive side. I think I actually ended up using a piece out of another chunk that I had, but this gives you some idea.


After some initial shaping to cut down on the work needed done after the epoxy has set, here's everything dry-fitted. I am working with the angled saw cut on the ironwood. It's coming out a bit differnt of a handle shape than I drew, but it'll be nice and comfortable once I've shaped it down.


I went ahead and rasped down some of the bulge on the Filipino ebony with a rasp.


Then I took everything apart and cleaned it with rubbing alcohol. I roughed up the tang with a file, giving plenty of surface area for the epoxy to stick to.


I mixed the epoxy on a slick piece of paper (actually a left-over invitation to an art show for one of the artists at the Hausmann Millworks where my shop is located - it was his suggestion) with a little piece of wood I cut. I made sure that each surface was well-slathered with epoxy, applied epoxy to the tang, and let the epoxy run into the tang-holes of each piece of wood. I popped air bubbles in the epoxy of the end-piece, making sure it was filled before I stuck it on the end of the tang.


Finally, I used two blocks of wood and the cross slide table of my Grizzly benchtop mill/drill to compress everything together and hold it overnight. I've never tried this before. I think I like this approach, although a carpenter's clamp might be easier. I actually saw someone post a picture recently doing the same thing using a caulk gun and a block of wood to clamp.


Alcohol-soaked paper towels helped clean up excess epoxy. Tomorrow I'll work on shaping the handle.

Monday, November 15, 2010

Further progress on bushcraft knife

Got the guard pretty much fitted today. It's copper, an electrical bus bar, actually. I ended up using a different bus bar than what is in the first picture.

If you look under the knife, sitting on top of the bus bar, there's a chisel-looking thing. That's a piece of leaf spring cutoff that I made into a blunt-ended punch slightly smaller than the tang/blade transition on the knife.


Using my hydraulic forging press, I cold-punched the slot for the tang. This was the first time I'd used my press and done it cold. Worked pretty well. Then I sawed it off of the main bar.


I hot-fit my guards. I clamp the blade in the vise with a piece of leather wrapped around, heat the guard, and drive it down with what in blacksmithing circles is called a "monkey tool". In this case, a piece of pipe flattened into an oval cross section on one end. Usually I use the piece of bicycle frame in this picture, but I found the tang was too wide on this one, so I quickly made one a bit larger. Driving the guard down is done with a hammer, but having only two hands, I couldn't show that part. I just pantomimed it, then fired up the torch and did it for reals.


And after it is down all the way:


At this point I hold the guard against the anvil with the tang still in it and hammer from the sides to close up any gap. Then I knock the guard off and straighten it. Now it's ready to do the main cleanup. I actually use a couple of progressions of sandpaper flapwheels on my angle grinder first, then move to the drill-held flapwheel as shown.


After that, I re-fitted it and went to the belt grinder to get the rough profile of the guard done before putting any wood on the handle. I try to minimimze the amount of guard shaping done when the handle is epoxied on since copper especially heats very quickly and can make the epoxy bubble out.

That's it for today.

Sunday, November 14, 2010

More detailed look at the new hammer

I had some folks who wanted a closer look at the mechanism.

Ever wonder how Klingons cut down trees?

Well now you know. This public service announcement brought to you by Helm Enterprises, Silliness Division.

Saturday, November 13, 2010

Test run of the new power hammer

I finally got my new power hammer wired! This is its first run. It was built by the same cousin who built the hydraulic forging press. It's a modified Appalachian "Rusty" helve hammer utilitizing a spare tire clutch. Very little new material went into making it. It has an 80 pound ram and is running dies made from railroad track caps. More dies and a different die holding system in the future.

The test piece of steel is about 5/8" automobile coil spring.

The Hausmann Millworks mentioned in the video is the creative community where my shop is located, just north of downtown San Antonio, Texas.

Friday, November 12, 2010

Custom bushcraft knife part 2

And today's update:

The knife taken out of the vinegar and washed off. The vinegar ate the scale off without really affecting the metal. The scale is harder than steel, so it would have worn my file out quickly and made it hard to do the work.


Clamped in the vise, filing the cutting edge. I forge as close as possible to my final shape, minimizing the amount of steel needed to be removed. I could grind what's needed, but I think the file marks go better aesthetically with the more primal look. Like the smoothness of your hammer marks shows your skill at the anvil, the evenness of your file marks shows your skill with a file. I'll be playing with grinding more in the future, and of course I do make satin finished blades now that use a lot of grinding to do, but when doing a forge finished blade, I tend to file my edges for now.


After bringing the edge down to the point where the next step in working the edge is a coarse whetrock, I file the choil. Some folks like choils, some don't. There are functional reasons for both schools of thought and aesthetic reasons as well. Mostly, I like the look of a good choil. It's a nice way to start the edge and not make a blade look like a stock removal project with a ricasso and plunge cut. If I'm making a forged blade, I don't see a reason to make it appear like it was gound from a bar. Well and good to those who do, or to those who are stock removal makers. It's just not the way I go. That's a half-round file I'm using to do this.


Then I clean up the shoulders at the tang/blade transition. Slightly rounded to keep stress risers down. On my small knives, the transition from the tang to the blade is the thickest part of the steel. It tapers distally from there to the point and to the end of the tang. This helps eliminate weakness at this vulnerable area. It also helps keep the balance even between the blade and the handle. Since the tang will be hidden in the wood, I do some grinding here to speed up the work. The grinding marks won't show, and actually provide more surface area later on for the epoxy to grip. Here it is ready to heat treat.


Some steels benefit from multipe heat treatment cycles, others don't. 5160, which is what the spring steel probably is, does benefit. I hardened this one three times by heating it in the tomato can gas forge and quenching in vegetable oil. Veggie oil works about the same as commercial quench oil and is non-toxic. Check for warps and for hardening with a file, then do the next cycle. Each time I quench is at a slightly lower temperature. I differentially harden small blades with an edge quench, giving a hard edge and springy spine. Also, I harden the tip a little softer than the rest of the edge and a little harder than the spine. The tip can undergo a lot of stress, and making it a bit softer will make it a lot tougher and less likely to break when stressed. A few minutes on a whetrock and you'l have it back, rather than having to get the blade re-profiled because the tip snapped off.


You can see the flames coming out of the forge from the oil burning off after the first quench.


After the third quench, I leave it in the oil a few minutes. Then I pull it, do a final check for warps, wipe it down, and sand off the worst of the baked-on oil. No shot of it post-sanding, but here it is post-wipe-down.


Finally, I draw temper in my high-dollar Wal*Mart toaster oven heat treatment furnace. It's now ready for me to do some more cleanup and start fitting the bolster.

Thursday, November 11, 2010

Custom bushcraft knife work in progress

A while back I was contacted by a member of Zombie Squad to have a custom bushcraft/general utility knife made, using the puuko design as our starting point. He showed me some pictures he'd collected off the Interwebz with knife features he liked, I made some sketches, and we agreed on design and price. I started work on it this week. I asked if he would mind me documenting the process, and he said go for it.

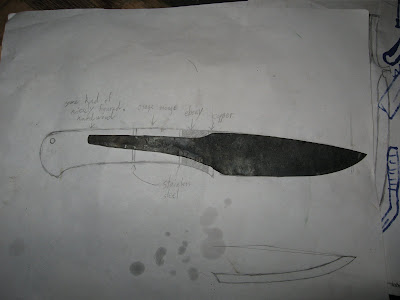
This is the sketch that this is all based on. There may be a few changes as the actualy knife is being made (as you'll see), but this is our guide.


The blade began life as a piece of pickup leaf spring. It was actually a relatively small scrap from me cutting out a blade blank earlier. After cleaning up the torch marks with my angle grinder and cutting it to length, I put it in my coffee can forge and commenced to hammering it into shape. I consulted with the sketch and got it fairly close. After cleanup grinding, I found that the angle of the tang to the blade needed changed, I needed to draw the length of the tang out some, and the blade was a half inch longer than the sketch.


I checked with the customer, who said to go ahead with the length the blade had turned out to be. If he had wanted it shortened down to match the sketch, I would have taken some of the blade to forge the tang longer. After tweaking, this is what I ended up with:


The blade is soaking in vinegar to eat the scale off. Should be ready to file the edge tomorrow.